
An SSH key is a pair of files: the private one stays with you, the public one goes onto the server. The server lets in whoever holds the matching half, and no password is needed. This guide covers creating the pair, adding it to a VPS, what to do about "Permission denied (publickey)" and how to forbid password login afterwards. Everything was run on a real Ubuntu 24.04 server.
The server here is a VPS with Ubuntu 24.04 (OpenSSH 9.6p1); the client is a Linux machine with the same OpenSSH. We checked key creation on Windows separately, in PowerShell. In the output the IP is replaced with 203.0.113.10 and the server name with myserver. We called the key file lab_ed25519 so as not to touch a real one; by default yours will be id_ed25519.
What an SSH key is and why it beats a password
A password can be guessed by brute force, watched over your shoulder or stolen from an infected computer. A key works differently. Creating one produces two mathematically linked files: a private one (id_ed25519) and a public one (id_ed25519.pub). The public file is like a lock: you can hand it to anyone and put it on any server. The private file is the key to that lock: it never leaves your computer, and the server only checks that you hold the matching pair. Guessing such a key by brute force is not realistic.
We use the ed25519 type: it is short, fast and today a sensible default. RSA exists for compatibility with old systems; we did not test it.
Step 1. Create the key pair
On Linux and macOS the ssh-keygen command is already there. -t ed25519 picks the type, -C adds a comment label (you will recognise the key by it later), -f sets the file name and -N "" sets an empty passphrase. In real life set a passphrase: it protects the key if the file is stolen. We left it empty so that the script would not wait for input.
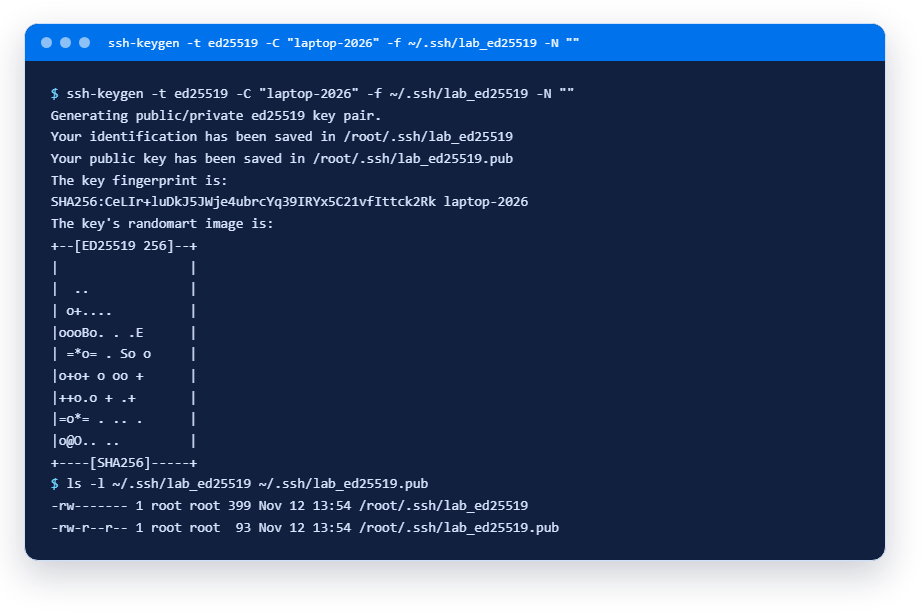
What we see. SHA256:... is the fingerprint: a short "signature" of the key used to compare keys. The picture made of characters (randomart) is the same fingerprint drawn. Note the permissions: the private file is -rw-------, readable only by its owner, and the public one by everyone. That is how it should be: if the private key were readable by others, ssh would refuse to use it.
Windows 10 and 11 ship with OpenSSH, and the same command works in PowerShell. This is what we got (the path is replaced with C:\Users\you\.ssh):
PS> ssh -V
OpenSSH_for_Windows_9.5p1, LibreSSL 3.8.2
PS> ssh-keygen -t ed25519 -C "laptop-2026" -f C:\Users\you\.ssh\id_ed25519 -N '""'
Generating public/private ed25519 key pair.
Your identification has been saved in C:\Users\you\.ssh\id_ed25519
Your public key has been saved in C:\Users\you\.ssh\id_ed25519.pub
The key fingerprint is:
SHA256:foMR9E6uIKFid/ja5OrVplrCiY0UeFJYedv8nYkgXPs laptop-2026
In PowerShell 5 an empty passphrase has to be written as '""'; without -N the program asks for a passphrase itself. If you connect from Windows with PuTTY, that program makes keys in its own format; there is a separate guide for it.
Step 2. Add the public key to the server
You need to append the contents of the .pub file, as one line, to ~/.ssh/authorized_keys of the user on the server. The easiest way is ssh-copy-id: it logs in with the password, creates the folder and the file with the right permissions and adds the key. First we confirm that key login does not work before copying, and then that it does:
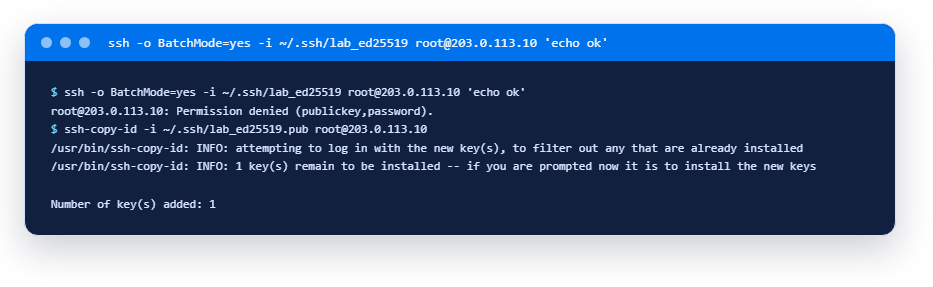
At the end ssh-copy-id prints a hint, "Now try logging into the machine"; we left it out. It asks for the password once. BatchMode=yes in the first line forbids any questions, so a failure shows at once, and in brackets the server itself lists the login methods it accepts: publickey,password.
Windows has no ssh-copy-id. Instead you pipe the file through ssh. We did not run the command below (it asks for a password by hand), but this is how it looks in PowerShell. If login fails afterwards, check the line endings of the pasted line:
type $env:USERPROFILE\.ssh\id_ed25519.pub | ssh root@203.0.113.10 "mkdir -p ~/.ssh && chmod 700 ~/.ssh && cat >> ~/.ssh/authorized_keys && chmod 600 ~/.ssh/authorized_keys"
By hand it is the same: open the .pub file, copy the whole line, paste it as a new line into ~/.ssh/authorized_keys on the server and set 700 on the .ssh folder and 600 on the file. The next sections explain permissions: people trip over them most often.
Step 3. Test the key login
Connect with -i pointing to the private key. If everything is right, the server lets you in without a password:
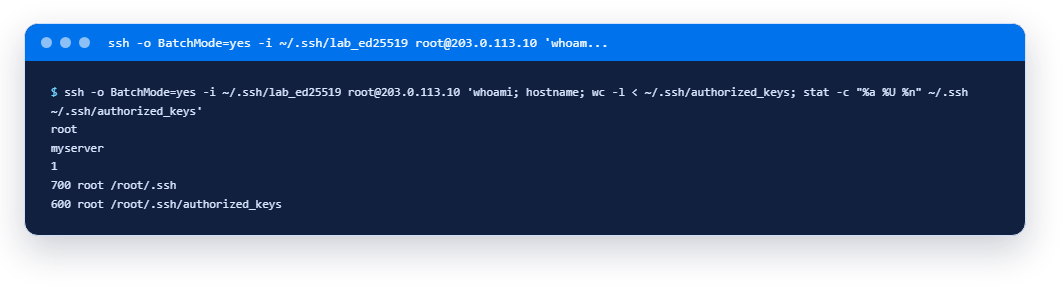
Reading it: we logged in as root; authorized_keys has one line (our key); the .ssh folder has 700 and the file 600. These are the permissions the server wants. If you have several computers, the server will have one line for each.
"Permission denied (publickey)": permissions and other causes
The most common cause is permissions that are too open on the server. To let you see the error, we deliberately made the file writable by everyone (chmod 666) and tried to log in:
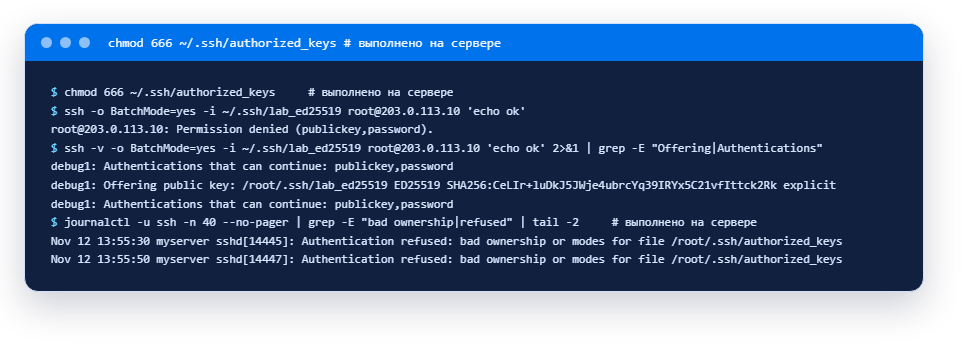
From the client the error looks the same for every cause: the key was offered, the server did not accept it. Only the log on the server names the reason: "bad ownership or modes for file /root/.ssh/authorized_keys" means the file is writable by others or owned by someone else, and sshd does not trust it. Fix it like this (we ran it, and login worked afterwards):
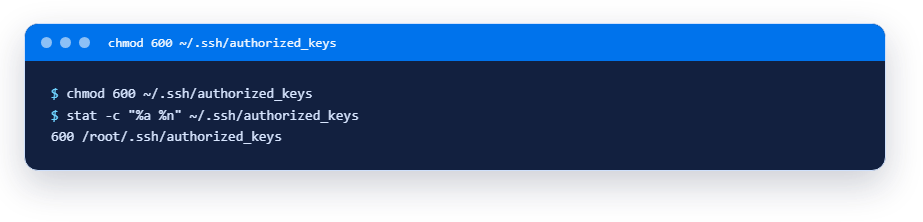
If the permissions are fine, go down the list: the key is in the file as one whole line, with no line breaks; you log in as the user the key was added for; the client offers exactly that file (give -i and -o IdentitiesOnly=yes so it does not try every key in turn); key login is not forbidden on the server (PubkeyAuthentication). We did not reproduce the last items of this list in the lab.
Tell "Permission denied" from "Connection refused"
While we ran dozens of connections in a row in the lab, the server suddenly answered "Connection refused" to the same command, although nothing had changed. The cause was a ufw limit rule on port 22: when six new connections arrive from one address within 30 seconds, the next ones are rejected. That is not a key problem. Wait half a minute and repeat; there is more about the firewall in our ufw guide.
Step 4. Turn off password login: the cloud-init trap
When key login works, you can forbid passwords over SSH, so guessing them becomes pointless. First keep a second session open and test key login in a new window: if you make a mistake, only the console in the panel can let you back in (how to use it).
In Ubuntu, sshd reads settings from the main file and from the /etc/ssh/sshd_config.d/ folder; the files in the folder are read alphabetically, and for each parameter the first value found is the one that applies. On our server the folder holds two files, and they disagree:
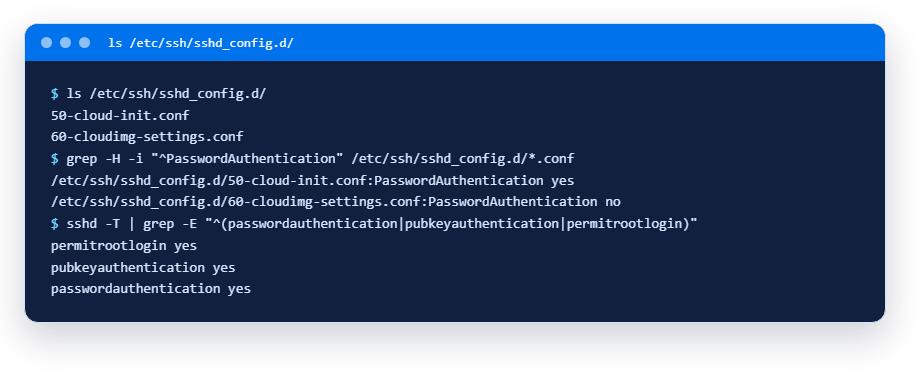
File 60-... says "no", but it is read later, so 50-... with "yes" wins. The result of sshd -T, which prints the settings that really apply, is passwordauthentication yes. If you had edited the wrong file, passwords would have stayed on and you would not have known. So we create our own file with a name that sorts earlier, and check the result:
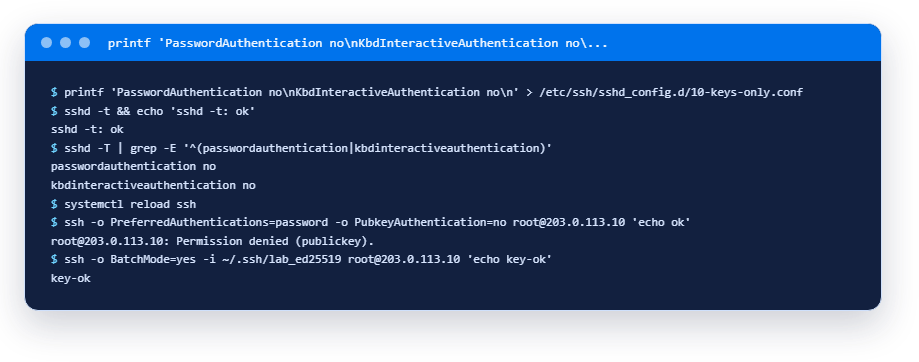
The order matters. sshd -t checks the configuration without a restart: if there is a typo, you learn about it before you break a working service. sshd -T shows the final values. reload applies the settings without cutting current sessions. The last two commands are the test: a password is no longer accepted (only publickey is left in the brackets) and the key works. After the lab we deleted 10-keys-only.conf and returned the server to its original state.
Conveniences: a name in the config, a passphrase and the agent
Typing -i, the user and the IP every time is tiring. The file ~/.ssh/config lets you give a server a short name. The IdentitiesOnly yes directive tells ssh to offer only the key you named:
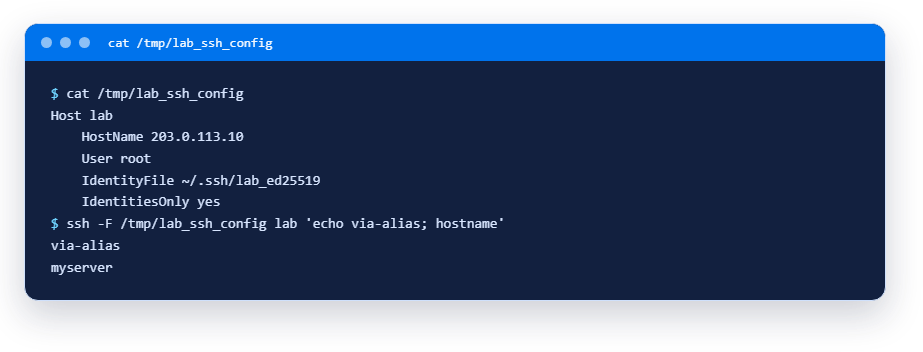
Normally this text goes into ~/.ssh/config, and then ssh lab is enough. We did not touch the real config: we wrote the text to a temporary file and pointed to it with -F.
A key without a passphrase is dangerous: whoever copies the file can log in. A passphrase encrypts the private key on disk, and to avoid typing it at every connection there is ssh-agent: a background program that decrypts the key once and remembers it until you log out. We put the passphrase on the command line only for the demo; type a real one at the prompt, so it does not stay in your shell history. This is what came out in our lab:
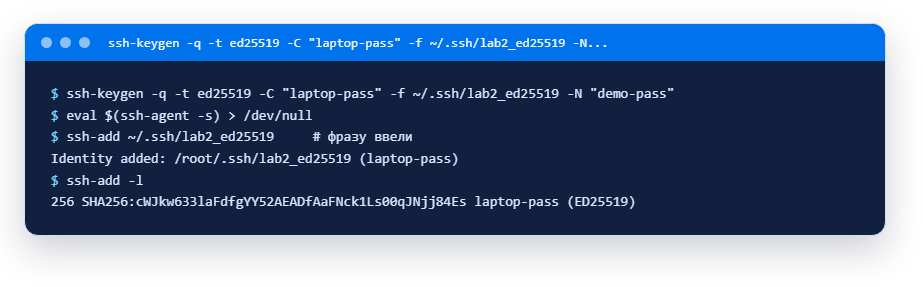
On Windows the ssh-agent service is disabled by default: ours showed the status Stopped and the start type Disabled. You can enable it from PowerShell as administrator (Set-Service ssh-agent -StartupType Manual, then Start-Service ssh-agent), but we did not run that command.
FAQ
How do I generate an SSH key?
Run ssh-keygen -t ed25519 -C "name" in a Linux or macOS terminal or in PowerShell on Windows 10 and 11. The program asks for a path and a passphrase, then creates two files: a private one and one with the .pub extension. You give the public one to the server and show the private one to nobody.
Where do I put the public key on the server?
Into ~/.ssh/authorized_keys of the user you will log in as: one line per key. Permissions: 700 on the .ssh folder and 600 on the file. ssh-copy-id does it most simply.
What if I lose the private key?
Get in another way (the console in the panel, or a second key if you added one), delete the lost key from authorized_keys and add a new one. That is why it makes sense to add keys from two devices in advance.
Can I use one key for several servers?
Yes: the public half can go to any number of servers. But if the private key leaks, you have to remove it everywhere, so many people create separate keys for important servers.
Is it safe to turn off password login?
Yes, if key login is already tested in a separate window and you have a fallback, the console in the panel. Without it, a mistake in the settings can leave you without SSH access.
Takeaways
- A key is a pair of files: the private one with you, the public one on the server.
ed25519is a good default. - Add the key with
ssh-copy-idor by hand intoauthorized_keyswith permissions 700 and 600. - "Permission denied (publickey)" does not tell the cause on the client: read the log with
journalctl -u sshon the server. For us it was the file permissions. - Turn passwords off after the key is tested, with a file numbered below 50 in
sshd_config.d(on our server50-cloud-init.confwould have won), and check the result withsshd -T. - A passphrase and ssh-agent protect the key and save you from typing it again.
Not verified here: RSA and ECDSA keys, copying a key from Windows (we gave the command but did not run it), starting ssh-agent on Windows, systems other than Ubuntu 24.04. More on the topic: securing a fresh VPS and connecting from Windows or macOS and Linux.
Read next
- How to copy files to a VPS and back: scp and rsyncscp for one-off copies, rsync for repeated ones: syntax, destination and trailing-slash traps, dry runs. Output from a live VPS.8 min8 min
- Out of memory on a VPS: swap and the OOM killer explainedDid the server silently kill your process for lack of memory? How to read the OOM killer log and add a swap file. Output from a live VPS.10 min10 min
- Console, reboot, Rescue mode and OS reinstall: how to save a VPS in WeaselCloudWhat the WeaselCloud panel offers when a server goes silent: reboot, console, Boot log, Rescue mode and reinstall, with a real breakage example.11 min11 min
Didn't find an answer?
The support team will help.